Table of Contents
I’m currently one of the cohosts (and producer) of the DrupalEasy podcast. When we started the podcast around 2008 there wasn’t much information on setting up the recording on your computer for a podcast setup. To be fair, there were some tutorials but they were either too simple or assumed I had previously mixed a KISS live album.
The following is my current podcast recording setup. It does use software that costs money but the overall expenditure was less than $100 if I remember properly. There may be some newer or cheaper ways to do things than I’ve listed here but I know that this works. Also, this tutorial will be very OS X specific since we’ll get into things like virtual sound drivers. My overall goal for this post is to get you to a state where you can record a podcast and have good overall sound quality.
I’ll be covering editing of podcasts in a future post.
Overall Recording Flow
Microphone -> Audio Hijack Pro -> Soundflower -> Skype -> Audio Hijack Pro
(This is not a mistake, I use Audio Hijack Pro twice in the overall flow.)
Microphone
I currently use a Blue Snowball but any halfway decent USB microphone should work for you. You’ll probably want to make sure your mic is a condenser microphone to give you better range. If you don’t have the cash for a condenser mic, don’t worry, you can really use just about any type of mic, you just won’t sound as sexy to the audiophiles in your audience.
Note: The Blue Snowball I have is LARGE. Do not get this mic if you want to travel with it.
Audio Hijack Pro (mic input & processing)
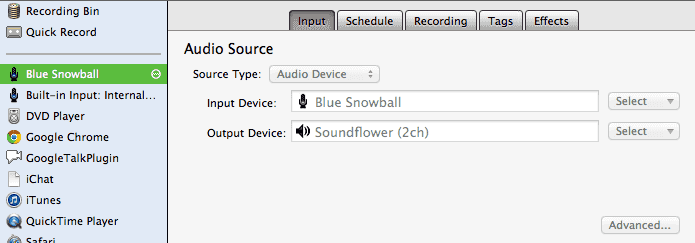
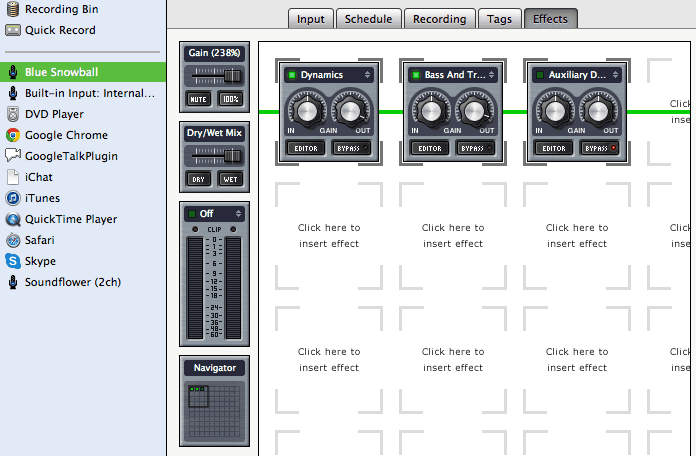
Audio Hijack Pro by Rogue Amoeba is what I consider to be my virtual mixer/sound board. I use this software to take the raw input from my microphone, mess with the audio levels (how loud it is) as well as things like bass (to hopefully make my voice less nasily) and then pipe it out to the next step, Soundflower.
Please keep in mind, there are millions of possible combinations of what you can do with this software. I try to keep my processing and complexity to a minimum to preserve my sanity. Remember, I am not a sound professional, I just record podcasts that broadcast at a pretty low bitrate (yes, the bar is pretty low.)
Short version of this step is sound comes in from mic, magic things happen, sound goes back out.
You can try a limited demo version of this software for free.
Soundflower
If Audio Hijack Pro is my virtual mixer, Soundflower is my virtual wires between various components (programs). I had a major block when I started. I had no idea of how to get the sound out of Audio Hijack Pro and into another program like Skype. Soundflower lets you set up either 2 channels or 64 channels to pass your audio around. If you are reading this article, you’ll probably just want to use 2 channel. I’m sorry that I don’t have any screenshots for this step but the program mostly just installs behind the scenes and you just push sound to it and pull sound from it, there is an interface but I never use it.
Remember to reference my Audio Hijack Pro screenshot of input/output where you can see that I’m outputting to Soundflower (2ch).
Soundflower is free.
Skype
There are many ways to connect to people over the internet for audio conferences. For the DrupalEasy podcast we use Skype. It has its advantages and disadvantages but overall for audio podcasts its easy to setup, is cross platform, mostly works and is free for audio only calls.
Before I get too deep into my Skype setup I do have to warn you that Skype only thinks in two channels, you and everybody else. This is great if its just you and one other person on the podcast but if you have multiple people on the call be prepared to have all of their audio squished into one channel. This isn’t really a deal breaker for me but keep in mind, if your guests talk over each other this can make editing much more difficult.
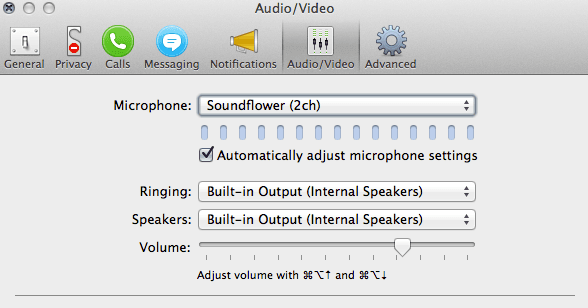
When hooking Skype into our setup there’s only one thing to do. Go into your Preferences, go to Audio Video and select the Microphone of Sunflower (2ch). DO NOT set this to your real microphone (or else you won’t get all that magic from Audio Hijack Pro.) Remember, Audio Hijack Pro output your mic to Soundflower and now Skype is reading that in from Soundflower.
Linux users, double check on your audio settings for microphone gain on your OS level as well as Skype. Most Linux users forget to disable one of them so you end up with a double gain (which sounds good in theory but isn’t) situation which causes the levels to jump all over the place and then you mostly hear really loud ambient noises like the laptop fan.
Skype is free for Audio only conference calls.
Audio Hijack Pro (recording Skype)
Remember when I said it wasn’t a mistake that I use Audio Hijack Pro twice? Well that still holds true, I’m not daft. At this stage we need to actually get the audio out of Skype and get it recorded to disk. I’m not going to sugar coat it, the config is going to get a little crazy here so hold on to your goats.
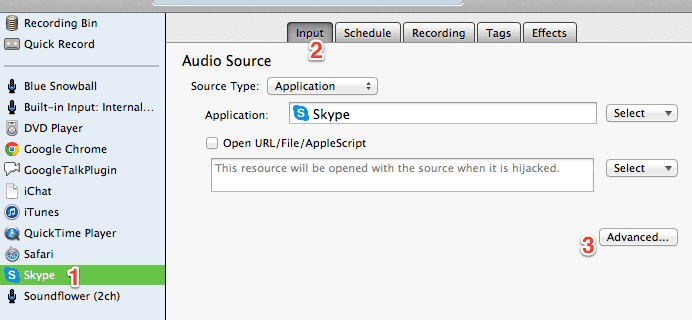
If you don’t see Skype in your Audio Hijack Pro Source List click on the little plus at the bottom of Audio Hijack Pro and select your Skype app to have it listed in the left bar of Audio Hijack Pro like my screenshots show.
Once you have Skype in your source list, select Skype, click on the Input Tab and click on Advanced. In the advanced window, make sure Include audio inputs and Split between channels are checked (don’t forget to hit OK). I assure you this is all entirely normal. We’re just telling it to make sure you have a channel and everybody else is on another channel. If this last sentence doesn’t make sense don’t worry, it will make more sense when we get to the editing steps.
The only other change you’ll want to do is on the recording tab. Make sure the Format is set to For archiving to disk to get the best quality while not taking up your entire drive.
That should be the last of the setup we have to do. Please remember that you only need to do the setup for your microphone and Skype once. After that, Audio Hijack Pro will remember your settings.
Time to record
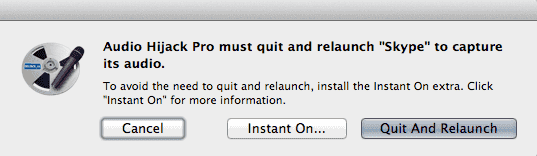
Since everything is setup now you just need to highlight your microphone’s name in Audio Hijack Pro and click the Hijack button to capture your input. After that you just need to repeat the process but this time highlighting Skype in Audio Hijack Pro. Keep in mind that Skype is an application, Audio Hijack Pro will pop up a dialog asking you if you want to relaunch. The odds are, you’ll want to relaunch the app before recording.
Now that you’ve hijacked everything you need to hijack, make sure Skype is selected in Audio Hijack Pro and click on the record button. You should now be ready to record your podcast.
What do I do after I record my podcast?
Part two of the series is now available. Find out how to edit the podcast, modify levels and add in music.